Gradient Thing
This is Unfinished
 Screenshot of Gradient Thing
What is it ?
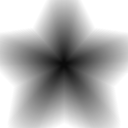
It’s a little web tool to generate radial gradients based on an input shape which you can supply yourself along side some parameters like minimum size, maximum size and the number of slices of that given shape to generate. It makes images such as these:
Why was it made?
I’m working on a game in Godot, depending on when and who is reading this then you may already know about it. Essentially, adding transition animations between either scenes or more abrupt changes I can use a small animation to cover and then uncover the screen. Think something like pokemon when you find a monster.
One of the most simple ways to have custom animations of this kind is to have a shader that uses a smooth step to mask a big rectangle over the screen, it will make certain parts transparent or not based on an input image and a cut-off value.
[Example GIF]
uniform sampler2D mask : hint_default_black;

void fragment() {
	float value = texture(mask, UV).r;
	float alpha = smoothstep(
        cutoff,
        cutoff + smooth_size,
        value * (1.0 - smooth_size) + smooth_size
    );
	COLOR = vec4(COLOR.rgb, alpha);
}
The shader snippet above uses a mask image, one of the main collectables in the game was a star and I wanted to make a star gradient, probably doable just using gimp or other image editing software I found it to be easier to make a shape that I can then use to generate the final gradient to be used in the shader.
[Final Finished GIF]
How was it made?
My first instinct for doing this was to make it as a web tool, using vanilla JS and some framework / library for drawing images / sprites to the screen. I knew PIXIJS from previous small projects I’d used it for and after an hour or so of fiddling I had a working example.
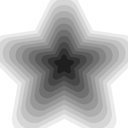
The tool essentially just stacks sprites on top of one another with darker and darker shades of grey and then black while also decreasing the size of the image. This creates the smooth gradient and is why more ‘stepped’ versions that aren’t smooth can be created.
The next day with another hour of tinkering I had a version that could use any image from the users machine by getting the blob from an <input type="file"> and piping that in as a texture to load inside PIXI using Assets.load. After hooking up input fields to the parameters, it was complete and now you can use it by going to the link at the top of the page.
Did it solve the problem?
- Sure [GIF of Star Version]
- Kinda [GIF of colon three]
- Maybe Not [GIF of super borked thing]
What can be improved / added?
- Performance concerns
- Twisting
- More complicated shaders
- Show examples of coloured versions with moving parts